A stripped screw is often removable, but the next attempt matters more than the last one. To remove stripped screws, stop using a spinning driver and work from the least aggressive method to the most destructive.
Start by improving the bit’s grip, then try hand tools, gripping methods, or an extractor. Cutting a slot or drilling the screw head should be a last resort because those methods can damage the surrounding material.
Start by identifying the screw and the damage
A screw is stripped when the recess in its head – Phillips, square, Torx, hex, or another drive style – has worn enough that the bit slips. The threads may still be fine. That distinction matters: a damaged head needs a new way to turn it, while a screw that turns but will not come out may have damaged threads, corrosion, or a hidden nut or anchor.
Before choosing a method, look closely at the head. Is it still proud of the surface, flush with it, or recessed below it? Is the screw in soft wood, hardwood, sheet metal, plastic, drywall, or a piece of equipment? Also check whether removing it could affect a safety-critical assembly.
Do not force removal from electrical equipment, gas appliances, garage-door components, structural hardware, or machinery whose instructions require service. If the screw holds a guard, a brake, or another manufacturer-installed safety component, contact the manufacturer or a qualified technician rather than improvising.
How to remove stripped screws: work through these methods
Begin with the method that preserves both the screw and the workpiece. Move on only when the previous approach clearly fails.
1. Stop using the drill or impact driver
Set the power tool aside. Repeated slipping rounds the recess quickly, and an impact driver can deform a small screw head or crack brittle plastic. Use a manual screwdriver first because it gives you better feedback and lets you apply controlled downward pressure.
Clean paint, sawdust, rust flakes, or debris from the recess with an awl, pick, or stiff brush. A bit cannot seat fully if material is packed into the head.
2. Match the bit exactly and seat it fully


Many apparently stripped Phillips screws are really being driven with the wrong size bit. Try the next size up or down, but do not guess based on appearance alone. The correct bit should fill the recess, sit deep in the head, and resist side-to-side movement.
Hold the screwdriver straight in line with the screw. Press firmly into the head while turning slowly counterclockwise. For a stubborn screw in wood, steady pressure is usually more effective than speed. If the screw begins to move, keep the driver aligned until it is fully removed.
Torx and square-drive screws are especially sensitive to bit fit. A nearly correct bit may turn once, then damage the corners of the recess.
3. Add grip with a wide rubber band
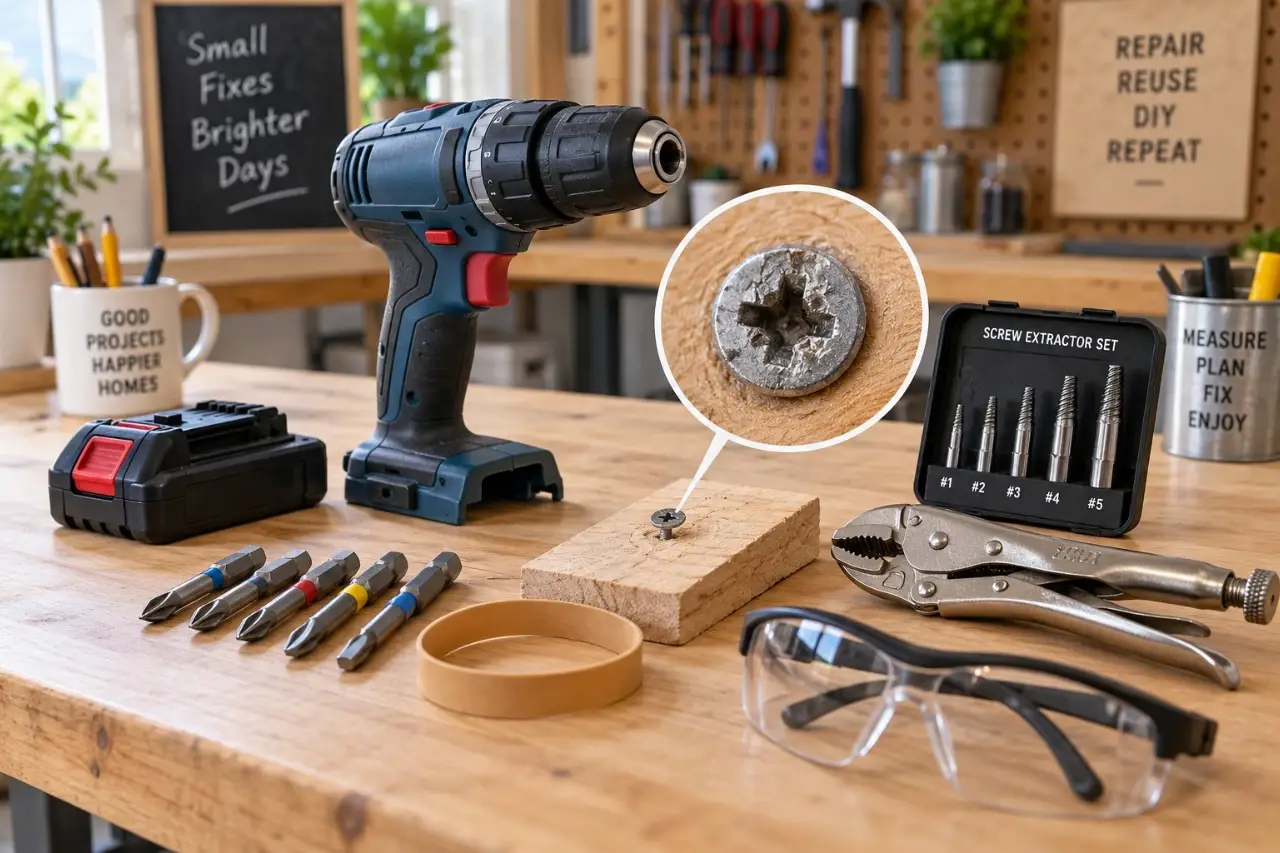
For a shallowly worn screw head, place a broad rubber band over the recess, press the correct screwdriver bit through it, and turn slowly. The rubber can fill small gaps between the bit and the damaged head.
This is worth trying on small screws with minor stripping, particularly in cabinet hardware and light-duty fixtures. It will not overcome a severely rounded recess, a rusted screw, or a screw installed with excessive torque. Avoid using loose fragments of rubber around moving equipment.
4. Grip an exposed head with locking pliers
| Preview | Product | Price | |
|---|---|---|---|

| WORKPRO 5-Piece Locking Pliers Set, Vice Grips with Chrome-vanadium Steel | View on Amazon |
If the screw head stands above the surface, locking pliers may be the simplest answer. Clamp the jaws tightly around the outside edge of the head, then turn the pliers counterclockwise. Keep the jaws parallel to the screw head so they do not slip off and scar the surrounding surface.
This approach works well for pan-head, round-head, and hex-head screws with enough exposed edge. It is not practical for countersunk screws that sit flush with wood or metal. Put a thin piece of cardboard or plastic beside finished surfaces to reduce accidental marks, but do not place anything that prevents the pliers from gripping securely.
5. Try a manual impact screwdriver for stuck screws
A manual impact screwdriver converts a hammer strike into downward force and turning force. It can help with a screw that is seized by corrosion or paint but still has enough recess left for a bit to engage. Use only the correct bit, keep the tool square to the fastener, and follow the tool manufacturer’s instructions for safe use.
This method can damage delicate assemblies, tile, brittle plastic, thin sheet metal, and finished furniture. It is generally more appropriate for durable metal hardware than for small household screws.
6. Use a screw extractor when the recess is beyond saving


A screw extractor is a hardened, reverse-threaded tool designed to bite into a drilled pilot hole and turn the screw out. Extractors can work well, but they demand patience. A broken extractor is much harder to remove than the original screw because extractor steel is very hard.
Follow the extractor manufacturer’s size chart for the screw diameter. First, use a center punch to mark the middle of the screw head. Drill the pilot hole size specified by the extractor manufacturer, using controlled speed and pressure. Then turn the extractor counterclockwise with the recommended holder or tap wrench.
Stop immediately if the extractor does not bite, begins to twist, or requires heavy force. Do not use an impact driver on an extractor unless its manufacturer specifically permits it. In wood, consider whether removing the surrounding material and repairing the hole would be less risky than forcing an extractor.
7. Cut a new slot only when the head is accessible
A rotary tool with a thin cutting accessory can cut a straight slot across a damaged screw head, allowing removal with a flat-head screwdriver. This can be effective on a larger screw with a flush or slightly proud head.
The trade-off is clear: the cutting accessory can easily scratch metal, chip paint, melt plastic, or cut too deeply into wood. Wear eye protection, control sparks around combustible materials, and shield nearby surfaces when practical. Do not use this method near fuel, solvents, batteries, or unknown materials that may be flammable.
8. Drill off the head as a last resort
If the screw head cannot be turned, drilling the head off may release the part it holds. Select a drill bit appropriate for the screw size and material, center it carefully on the screw head, and drill slowly until the head separates from the shaft. Once the attached part is removed, enough of the remaining shaft may be exposed to grip with locking pliers.
This method sacrifices the screw and can enlarge or damage the mounting hole. It also creates metal shavings, so protect your eyes and clean the area thoroughly. If the screw is in a threaded metal hole, avoid drilling deeper than necessary or you may damage the threads.
Choose the method by screw position
| Screw condition | First method to try | Avoid initially |
|---|---|---|
| Recess slightly worn | Correct manual bit and firm pressure | Impact driver |
| Head exposed above surface | Locking pliers | Drilling |
| Head flush in wood or metal | Correct bit, then extractor | Pliers that cannot grip |
| Painted or lightly corroded metal screw | Clean recess, manual impact screwdriver | Excessive torque |
| Tiny screw in plastic or electronics housing | Correct precision bit and gentle hand pressure | Extractors, cutting, or forceful impacts |
Common mistakes that make a stripped screw worse
The biggest mistake is continuing after the bit starts camming out. Camming out means the bit rides up and slips out of the recess under turning force. Each slip removes more material from the screw head.
Avoid drilling at high speed. Heat can soften plastic, burn wood, damage a finish, and dull the bit. Do not lean a drill sideways in an attempt to make it grab. That widens the damaged area and can snap a small bit.
Penetrating oil can help with corroded screws in metal, but it does not repair a stripped head. Use it sparingly, follow the label, allow appropriate time to work, and keep it away from surfaces where it could stain finishes or create a slipping hazard. Do not apply it to energized equipment or near ignition sources.
Replace the fastener and repair the hole if needed
Once the screw is out, inspect the threads and mounting hole before installing a replacement. Match the screw’s diameter, length, head style, and thread type. A wood screw, machine screw, and sheet-metal screw may look similar but are not interchangeable.
If a wood screw hole has become loose, a repair may be needed before reinstalling hardware. For a simple nonstructural wood application, a properly sized wood repair plug or dowel can provide fresh material for a new pilot hole. For threaded metal, damaged plastic, or any part that carries significant load, use the manufacturer’s specified repair method or seek qualified help.
A stripped screw is frustrating, not a signal to use more force. Slow down, protect the workpiece, and stop when the repair begins to create more damage than the original fastener is worth.
Ulverion is reader-supported. Your support allows us to research tools, create practical guides, and share reliable DIY advice for homeowners, makers, and workshop enthusiasts.